Filed under: How to | Tags: bedroom, headboard, home decor, how to, tutorial
My apartment has two bedrooms: a large one with no discernible closet, and a small one with a glorious amount of closet space. Since I didn’t like the idea of having to go ALL the way down the hall every morning to get dressed (I’m super lazy like that), I decided to take the smaller bedroom. Now, I haven’t had a headboard on my bed in my last several places, but for some reason, this room just feels like it needs one. I think it’s the fact that I can’t paint the walls… I feel like I really need something to break up the seemingly endless sea of off-white. However, since space is at a premium (not to mention money), I didn’t want to buy something big and bulky.
Enter my new crafty best friend: Stiffen Stuff. You may recall that I’ve used this product before, both here and here. Now I’m going to see how this stuff works on a much larger scale!!
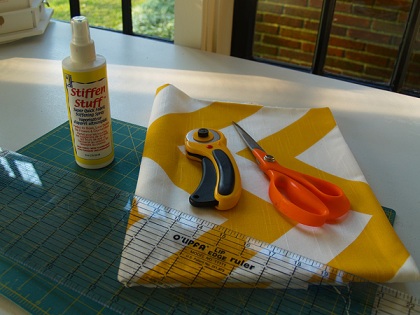
For this project I used:
– 1 yard of good quality decorator fabric, which I bought at Premier Fabrics in Germantown. I chose Zig Zag in Corn Yellow.
– Stiffen Stuff
– Good fabric scissors
– An iron
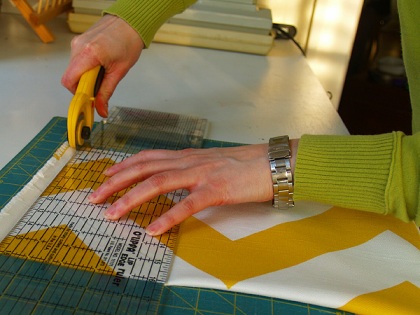
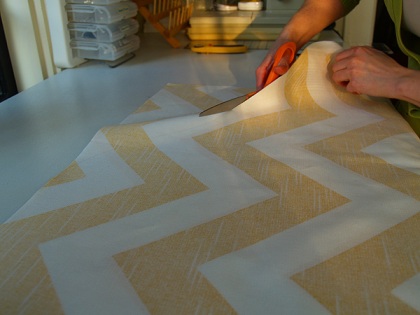
Step 1: Cut the selvedge off and square up the fabric. If you have a queen bed, you’re going to want to keep as much of the width as possible, so be sure to cut close to the edge of the selvedge.
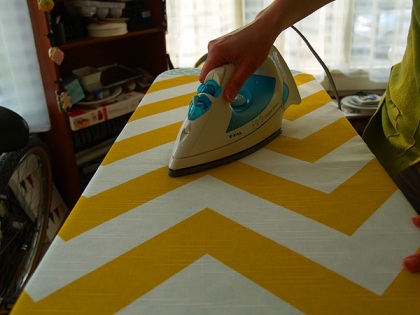
Step 2: Iron that puppy to within an inch of its life. Once you start spraying you’re not going to be able to iron it again, so you want to get it as flat as possible now.
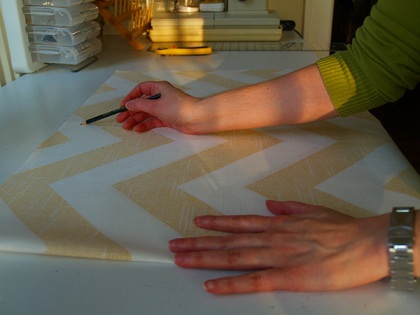
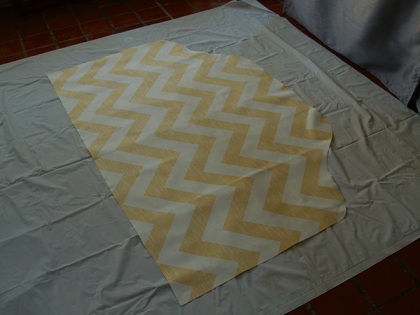
Step 3: Fold the fabric in half lengthwise and sketch on the shape of your headboard. Since my fabric is so angular, I decided I wanted the shape to be really fluid and curvy.
Step 4: Cut out your headboard.
Step 5: Lay your headboard, face down, on a flat surface, with a tarp under it to keep your floor or table from getting sticky (I use a shower curtain liner from the $1 store… way cheaper than an actual tarp). I planned on spraying the entire back, but within a few minutes, my fingers were cramping and the spray bottle started sticking. So instead, I opened the bottle, poured a little into a bowl (one I didn’t mind never eating out of again), and brushed it on with an old paintbrush. Try to get at least a little glue on every inch of the fabric, but be SURE to REALLY SOAK the edges. Let it dry overnight.
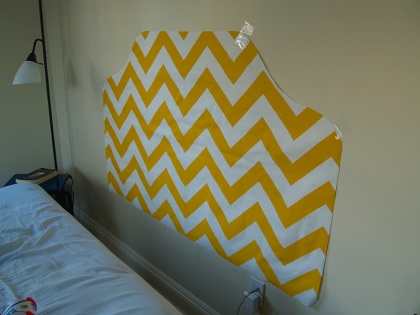
Step 6: Once your headboard is completely dry, it’s time to place it on the wall. You can use packing or masking tape to temporarily hold it up. Make sure it’s straight before you start ironing!
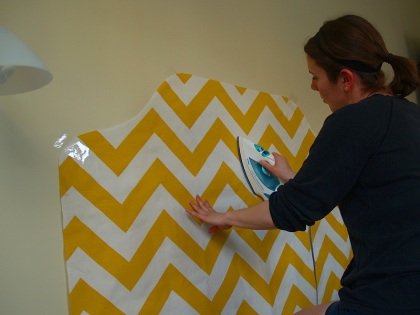
Step 7: Set your iron to high heat with no steam. I started in the middle, ironing the middle section from top to bottom, then working my way out. Be sure to focus on the outer edge, making sure it is firmly attached all the way around.
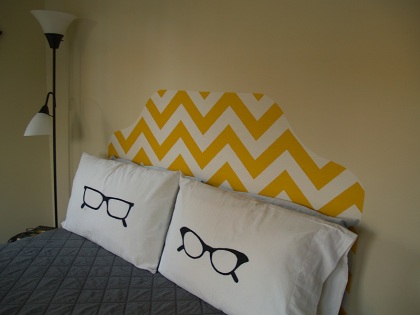
And you’re done! I’m really happy with how this project turned out. It really brings life into my bedroom, which has felt pretty lifeless since I moved in. And the best part is that it cost about $9, didn’t take much time, and is completely reversible if I get sick of it!
UPDATE 1/27/2012: Since I’m moving out of this apartment, I had to take down the headboard. Big :(!!! BUT! It came down SO easily, didn’t take one bit of paint with it, and is still in perfect condition, so I can reuse it! I’m not sure yet if I’d have to respray, or if the starch still remaining on the back of the fabric will be enough to adhere it to the wall, but when I get around to putting it up, I’ll let you know!
154 Comments so far
Leave a comment

Looks great!
Love the yellow;)
Lovely greetings…
http://pudel-design.blogspot.com/
Comment by Pudel - design March 24, 2011 @ 5:47 pmWhat a fantastic idea! Just love this, and the fabric is so lovely for spring!
Comment by Hannah March 25, 2011 @ 7:26 amthanks for posting this! im married to a Navy sailor and we are not allowed to paint pretty much ever, or at least until we buy our own house many years down the road. I had heard from many a military wife to use starch and starch sheets/fabric to my walls inorder to mimic painting!
Comment by Mego! March 25, 2011 @ 7:34 amim so glad to see it in person before trying it! thanks!
where did you get those pillowcases?! they are amazing. and love the headboard.
Comment by Brittney March 25, 2011 @ 7:35 amThanks, Brittney! Here is the link to the pillow case tutorial: https://metalandmud.wordpress.com/2011/02/10/how-to-freezer-paper-stencil-pillow-cases/.
Comment by metalandmud March 25, 2011 @ 8:36 am[…] apply liquid starch (which makes it removable) and iron the board straight to her wall to give the appearance of a proper upholstered headboard. I followed up with her to ask about how well it’s staying put (with heads sleeping against […]
Pingback by genius idea: starched fabric headboard - - Hosted March 25, 2011 @ 7:38 amI just came over here because I saw your project over on Design*Sponge. I’ve been wrecking my brain over what to do about a headboard for ages and I think this is it! Thanks for sharing!
Comment by Annika March 25, 2011 @ 7:49 amLooks great, love the fabric too!
Comment by jessica March 25, 2011 @ 8:31 amwhat an awesome idea! also, where or where did you get those fantastic pillowcases?!?!
Comment by dain March 25, 2011 @ 8:38 amPillowcase tutorial! https://metalandmud.wordpress.com/2011/02/10/how-to-freezer-paper-stencil-pillow-cases/
Comment by metalandmud March 25, 2011 @ 8:46 amIs it possible that ironing the wall causes damage?
Comment by Tanya March 25, 2011 @ 8:47 amHi Tanya. This is the 3rd time I’ve used this technique and I haven’t had any problems so far!
Although you should use common sense when ironing, obviously. Keep the iron moving and don’t let it sit in one spot for too long. Just like when you’re ironing clothes!
Comment by metalandmud March 25, 2011 @ 8:50 amExcellent! Thanks!
Comment by Tanya March 25, 2011 @ 11:01 amThis is GREAT! Might be the headboard solution I’ve been looking for… thanks!
Comment by Ellen March 25, 2011 @ 9:39 amawesome idea! saw you on d*s. Looks really fabulous in your room 🙂
Comment by poindextr March 25, 2011 @ 10:27 amSo clever! I think it turned out great too!!
Comment by nicole March 25, 2011 @ 10:38 amLove this!
Might it be possible to create a padded version by making a stuffed pocket (two pieces of fabric with foam in between) and ironing to the wall only around the perimeter (where there’d be no foam)?
Comment by Shiv March 25, 2011 @ 10:56 amHmmm… it’s possible! I think I’d probably put the foam directly against the wall, and the put the fabric over it, with the edges ironed to the wall. Don’t see any reason to do the back piece of fabric, since you wouldn’t see it!
My only concern would be that the foam would make it more likely to pull away from the wall. But if that did happen, you could just iron it back down!
Let me know if you try this, I’d love to see how it works!!
Comment by metalandmud March 25, 2011 @ 11:03 amI also loved this and was thinking of a version with pockets that are stuffed with light batting to create a button-tuffeted effect. I was struggling with coming up with something that doesn’t include the bulk of too layers, unless there is a way to keep the top layer attached but not made stiff with the starch.
Comment by Sincerly,Birdie March 30, 2011 @ 1:10 pmIdeas…ideas, thanks for so much great inspiration!
I would make sure the edges are wide enough to hold it up. You could also use the “button” in the middle of a tufted section as an anchor point and iron those places to help it hold.
Comment by TouchTheSquid5 May 2, 2013 @ 10:48 pmSuch a great idea! This is definitely on my to-do list!
Comment by Vanessa March 25, 2011 @ 11:23 amI love this! Came over from Design Spong. I will be adding you to my reader. My husband and I will be moving to the Memphis area in the fall! I’m so excited!
Comment by Paulina J! March 25, 2011 @ 1:36 pmI’m sorry if this seems obvious, but ironing it just sticks it to the wall? How does that happen?
Comment by stegosaurus March 25, 2011 @ 1:39 pmYou spray the back of the fabric with “Stiffen Stuff” first. That makes it adhere to the paint, but still peel off easily. I’ve also heard that this works with just plain old starch, but I haven’t tried that yet. Will probably give it s shot once I run out of this bottle!
Comment by metalandmud March 25, 2011 @ 2:08 pmI always wondered how starching fabric to walls worked. It looks great!
Comment by Andrea March 25, 2011 @ 2:24 pmI wandered over from d*s and was excited to see you’re in Memphis (where I’m from) and that you used fabric from Premier. I made an upholstered headboard with the avocado green chevrons from the Premier Fabrics store in Meridian, MS just a few months ago.
Comment by Diana March 25, 2011 @ 3:55 pmYour idea is perfect for living on base. Too bad our bed is right in front of a low window.
This is so beautiful! As a college student we are never allowed to paint the walls in our apartment! This may be a silly questions, but how do you get it off when you’re done?
Thank you so much for sharing!
Comment by livealight March 25, 2011 @ 4:01 pmThanks Kelsey!
When you’re sick of it, you can just peel it off! Easy as that!
Comment by metalandmud March 25, 2011 @ 4:06 pmI love this. The hubs has been promising a headboard for so long, but is too busy. What a great idea. And that yellow chevron is the exact print I’ve been looking for. You’re a godsend! So glad to have found you.
Comment by Kara March 25, 2011 @ 5:47 pm[…] su página tiene muchos tutoriales muy interesantes, por ejemplo cómo hacer una cabecera matrimonial con tela, desde mi punto de vista una idea excelente que, debo confesar, robaré para mi […]
Pingback by Oh Mundo Cruel! » Metal and mud, grandes ideas para la casa + joyería March 25, 2011 @ 6:03 pmi’ll say what everyone else is saying, this is great! also a perfect idea for the city apartment dweller. thx.
Comment by candace March 25, 2011 @ 6:12 pmOh my…. I *LOVE* this! Thanks for the tutorial, and your pillows are totally cute. Found a new fave blog 🙂
Comment by Lex March 25, 2011 @ 6:47 pm♥
[…] How To: Fabric Headboard My apartment has two bedrooms: a large one with no discernible closet, and a small one with a glorious amount of closet […] […]
Pingback by Top Posts — WordPress.com March 25, 2011 @ 7:09 pmI LOVE this project idea! While reading your story I realized that so many things rang a bell…I too live in an apartment plagued with off-white walls and took the smaller of two bedrooms in lieu of a larger closet. The room is barely big enough for our queen-size bed and two small end tables. I’ve been playing around with ideas about what I could do for a headboard and now I think I know what that is! Thank you 🙂
Comment by zween March 25, 2011 @ 10:51 pmLove it!
Comment by allison fortune March 26, 2011 @ 6:58 amYour headboard looks terrific!! If you purchase a plain bottle of liquid starch, you can submurge the entire piece of fabric into the starch and apply without ironing. This is also fun to do an entire wall in, especially if you like changing your decor frequently, without the fuss and muss of removing wall paper. It can be a little messy however, due to the “dripping” of the starch when you pull the fabric out of the container you use.
Comment by Melissa March 26, 2011 @ 11:20 amBeautiful job and terrific looking bed!
I’ve been wanting to add some contrast on a wainscoting for my grandbaby’s nursery. Really didn’t want plain paint but didn’t want to wallpaper, either. If I use starch, will dampness mess up the paint or sheetrock underneath? Can you give me more specific details on how to do this?
Comment by arlene March 29, 2011 @ 3:21 pmSince you let the fabric dry completely before applying, and don’t use a steam setting on your iron, there is really no dampness to worry about. I have used this on both walls and painted wooden doors, and have had no problems.
Just let me know if you have any other specific questions!
Comment by metalandmud March 29, 2011 @ 3:28 pmg
Comment by talyon10 March 27, 2011 @ 4:51 am[…] simple little genius ideas from a lovely blogger I am now completely loving. Simple Sunday a la Metal and Mud (dontcha just love the name)? […]
Pingback by Simple Sunday | REOlistic Renovation March 27, 2011 @ 8:32 amThis looks amazing, what a great idea. I was just wondering what size bed you had, can’t quite tell if its a double, full or queen. I wanted to do this on my queen size bed and was wondering if 1 yard would be enough fabric to cover the length of the head board area. Thanks!!
Robyn
Comment by Robyn March 27, 2011 @ 9:53 amHi Robyn,
I have a Queen bed, and a yard was JUST enough. But it all depends on which direction your fabric goes. Since the pattern went from selvedge to selvedge (and not from cut to cut), I had the entire width of the fabric to work with (I believe it was 56″). If you want your pattern going the other way, you’ll want to get 2 yards.
Let me know if you have any other questions, and I’d love to see the project when it’s finished!!
Comment by metalandmud March 27, 2011 @ 10:48 am[…] Iron on fabric headboard by Metal & Mud. [via Design*Sponge] I could see it working with all sorts of shapes all over the […]
Pingback by 10 things I love « March 27, 2011 @ 5:19 pmLove this! Sending the idea to my grown kiddos and their spouses….. 🙂
Comment by annalucia March 27, 2011 @ 7:44 pmWhat a great idea. What does selvedge mean?
Comment by Molly March 29, 2011 @ 1:34 amThanks, Molly! The selvedge is the edge of the fabric, which is often printed with info about the fabric. Here you go: http://en.wikipedia.org/wiki/Selvedge.
Comment by metalandmud March 29, 2011 @ 8:24 am[…] 1. Create a fabric headboard for guest room. […]
Pingback by Inspiration « March 29, 2011 @ 3:33 pmSuch an awesome idea! It has inspired me to work on my guest bedroom. Thanks for sharing. Fingers mine will turn out half as good!
Comment by Dianne March 30, 2011 @ 8:48 amDianne
[…] perfect “champagne taste on a beer budget” update to a bedroom (+ adorably chic his and hers pillows for some sweet […]
Pingback by Sarah’s Favorite Things | Salt & Nectar April 1, 2011 @ 2:08 am[…] :: I’ve been trying to figure out a good solution for our headboard-less bed, and this fabric headboard DIY from Metal and Mud might just be […]
Pingback by Friday Faves, April 1st | Meet Miss Jones April 1, 2011 @ 8:54 amHow did you keep the edges from fraying?
Comment by Emma April 12, 2011 @ 9:22 amThe spray makes the fabric stiff, which prevents fraying. That’s another reason I made sure the edges were really soaked.
Comment by metalandmud April 12, 2011 @ 10:14 amI love this idea! I really wanna try this with my bed, but I’m only renting. I’m afraid that when the time comes for me to move, when I try to take the headboard off it’ll take away some of the paint from the wall. Could that happen?
Thank you!
Comment by Melody April 14, 2011 @ 9:37 amIt shouldn’t! But if you’re worried, you might want to try a small test piece in an inconspicuous spot (maybe inside a closet?). Leave it up for a few days, then peel it off and see what happens!
When I did a similar project with thinner fabric, I did have a little paint stickage, so I would definitely recommend sticking with heavy-duty decorator fabric for this one.
Let me know how it goes!
Comment by metalandmud April 14, 2011 @ 9:42 amHey there!
A friend sent me your blog the other day & I was so excited to see you were from Memphis!! I grew up there and am living in Portland, OR now. I love it here, but miss Memphis all the time. Absolutely LOVE your blog & think I will try this headboard idea.
Best-
Drew
Comment by Drew April 14, 2011 @ 3:29 pmSay I maybe sprayed the WRONG side of the fabric with StiffNStuff.
Will it still stick to the wall?
If I spray the other side and then iron it will it stick to my iron?
I should maybe have kept the blog post up while I was doing it.
Thanks.
Comment by Victoria April 19, 2011 @ 12:14 pmI’d probably go ahead and spray the other side as well. But once you do that, I think you should be fine. It shouldn’t stick to the iron, I don’t think.
Be sure to come back and show us what you’ve done once you’ve finished! Can’t wait to see it!
Comment by metalandmud April 19, 2011 @ 12:28 pmEverything came out great! I even made little birds out of the leftover fabric for the opposite wall. You can see the results on my tumblr http://lackofsituationalawareness.tumblr.com/
Thanks for the great idea!
Comment by Victoria May 21, 2011 @ 12:46 pmI saw something similar but it was fabric cut into the shape of flowers. they were applied to the wall while wet with the starch. No need to iron that way if you are concerned about ironing on the wall.
Comment by Nadine April 20, 2011 @ 6:54 pm[…] to your bed and only spending around 10 dollars! That’s awesome! I saw this on a blog, Metal & Mud. Such an ingenious idea! So here it […]
Pingback by Fabric Headboard May 1, 2011 @ 1:37 pm[…] itt Címkék:ágytámla, csináld magad, Dekoráció, diy, fejvég, hálószoba […]
Pingback by Csináld magad: ágytámla May 3, 2011 @ 7:32 amI have tried several irons and cannot for the life of me get the fabric to adhere to my wall. I wish that it would work, do you have any suggestions or helpful hints? Did you use a steam iron? Should I try starching it again and putting it on the wall before it dries?
Comment by Emily June 20, 2011 @ 12:30 amAre you starching the BACK of the fabric? Are you using regular starch or the specific spray I used? (I’ve heard regular starch works just as well, but haven’t tried it, so I can’t vouch for it). I didn’t use steam at all, but the iron does need to be fairly hot. I’d try spraying it again (on the back), letting it dry, and ironing it up again. Maybe you didn’t use enough spray the first time around?
Comment by metalandmud June 26, 2011 @ 3:13 pmI’m having the same issues. I used an insane amount of starch – almost the entire 16 oz bottle for the same amount of fabric that you did. They didn’t have the same brand that you used, but the ingredients in the brand I used are identical to Stiffen Stuff. No matter how many times I iron the fabric on the wall, it won’t stay up. I don’t know what to do! I’m really bummed out – I had such high hopes for this project.
Comment by Samantha June 29, 2011 @ 7:02 pmAnd you are spraying the BACK of the fabric, and then allowing it to dry completely before ironing, right? What kind of paint is on your walls? I don’t see why that would matter, but I guess it could.
Comment by metalandmud June 30, 2011 @ 8:36 am[…] starched fabric straight onto her wall to create a headboard effect (original post and tutorial here). This method almost seems too good to be true; it’s cheap, safe, super simple, stays put, […]
Pingback by townhouse redo: “headboard” ideas « brecca loves June 23, 2011 @ 9:01 am[…] now they will always know! The technique can be used as a picture frame and you can even make a headboard! The best part is that it is 100% removable! I had to move the girl over because she was off […]
Pingback by DIY Fabric Bathroom Sign | June 29, 2011 @ 8:29 pmYes, I used a paintbrush to apply the starch to the back of the fabric and then let it dry overnight. It’s a rental apartment, so I have no idea what kind of paint they use. It doesn’t seem particularly high gloss or anything, so I don’t think that’s the problem, but I suppose it’s possible. Has anyone else had these problems? Would re-applying starch worthwhile, or do you think I should just attach the fabric with double sided tape? The fabric looks great, and I can’t bring myself to throw it out!
Comment by Samantha June 30, 2011 @ 6:05 pmI’m guessing you’re not getting enough starch on the fabric. I’d try actually spraying it on if possible. I actually transferred mine out of the original bottle (which jammed), and put it in a cheap spray bottle, and it worked SO much better.
I hope this helps!
Comment by metalandmud June 30, 2011 @ 8:39 pmI’ll give it a try. Thanks for your help!
Comment by Samantha July 1, 2011 @ 1:03 am[…] different projects, then move on to something else. You may have noticed that the Stiffen Stuff projects have petered out. As have the freezer paper stencil […]
Pingback by My New Favorite Art Supply « July 1, 2011 @ 9:08 amHi, am wanting to try this project, but I live in Australia and don’t seem to be able to find “stiffen stuff” over here. Can I just replace it with another brand or is there something super special in “stiffen stuff” that makes it work better than others?????
Comment by Donna July 14, 2011 @ 4:19 amI haven’t tested it out, but I’ve been told that any liquid starch should work. Just make sure you really soak the fabric, and spray on the back only.
Let me know if it works! I’d love the see the project when you’re done!
Comment by metalandmud July 14, 2011 @ 8:29 am[…] Check out the original post here. […]
Pingback by Awesome DIY Project To Do During CARMAGEDDON! July 14, 2011 @ 2:34 pmHi, I was just wondering if a heavier fabric such as velvet would also be able to work?
Comment by Bridge July 18, 2011 @ 6:49 amI don’t see why not! You may have to do a heavier coat of the spray, and be VERY careful not to get too much on the front of the fabric. You’ll also want to be careful with the iron, since holding a hot iron in one place too long on velvet can cause burns.
Let me know how it goes!
Comment by metalandmud July 18, 2011 @ 8:26 am[…] it’s fabric and it irons right on to the wall and my mom made it and it’s so cool (DIY here); 5. a little farewell card from my mother where she discloses that i am, in fact, the golden […]
Pingback by happy things. « Simply, Brooke. August 28, 2011 @ 4:04 am[…] Iron On: with some fabric and minimal supplies, we can iron a headboard true onto your wall! […]
Pingback by Bargain Saturday: 6 Ways to Fake a Headboard September 10, 2011 @ 9:59 amHello!– We’d like permission to feature this tutorial using one image from the tutorial on our site. Could you please email me for details? I can’t seem to find your contact info on the site. Thanks so very much!
Comment by Beth November 9, 2011 @ 11:41 pm[…] Fabric Headboard Sara’s Starched Fabric Headboard is fabric applied directly to the wall! This technique could be used for some fun silhouettes all […]
Pingback by November 13 ~ Passion for Decorating « Sew,Mama,Sew! Blog November 13, 2011 @ 10:13 amI think the headboard idea is really cute and I pinned this to my Pinterest board ages ago! It is a great tip! I would also love to know where you found those pillowcases?! They are an exact match to the glasses my husband and I actually wear! Thanks!
Comment by T December 12, 2011 @ 12:32 pmI made the pillowcases as well! Here’s the tutorial: https://metalandmud.wordpress.com/2011/02/10/how-to-freezer-paper-stencil-pillow-cases/.
Comment by metalandmud December 12, 2011 @ 12:38 pmAH! This might just be the perfect solution to an ugly dorm room! I’m off to college this fall, and I’ve been looking for months for non permanent and inexpensive ways to DIY my dorm room that are original and unique. Thanks so much!!
Comment by Macy H. January 4, 2012 @ 6:40 pmI featured your awesome fabric headboard over on my blog today. Here’s a link to the post: http://worthingcourt.blogspot.com/2012/01/money-saving-space-saving-headboard.html
Comment by Suzy @ Worthing Court January 18, 2012 @ 7:10 amThis is such a great idea! I am also a military wife so we rent a lot and I’m always looking for new ways to bring life to white walls! Thanks!
Comment by Amy Otis January 27, 2012 @ 10:04 am[…] Metal and Mud […]
Pingback by 7 Unique Ideas for a DIY Headboard » January 30, 2012 @ 7:07 pm[…] I bet nobody attempted this at home. This brilliant idea of creating a headboard that isn’t really a headboard occurred in the lack of not having some scrap material to make a real one. The projects consists in taking a piece of fabric, cut it in any shape you like , apply liquid starch, so it becomes removable and then iron the board straight on the wall. The result is amazing, you get the appearance of a proper upholstered headboard.{found on metalandmud}. […]
Pingback by 34 DIY headboard ideas February 8, 2012 @ 9:35 am[…] I bet nobody attempted this at home. This brilliant idea of creating a headboard that isn’t really a headboard occurred in the lack of not having some scrap material to make a real one. The projects consists in taking a piece of fabric, cut it in any shape you like , apply liquid starch, so it becomes removable and then iron the board straight on the wall. The result is amazing, you get the appearance of a proper upholstered headboard.{found on metalandmud}. […]
Pingback by 34 DIY headboard ideas | Home and Design February 8, 2012 @ 10:47 am[…] Fotos: metalandmud […]
Pingback by Cabecero para la cama « Manualidades February 23, 2012 @ 10:41 am[…] I bet nobody attempted this at home. This brilliant idea of creating a headboard that isn’t really a headboard occurred in the lack of not having some scrap material to make a real one. The projects consists in taking a piece of fabric, cut it in any shape you like , apply liquid starch, so it becomes removable and then iron the board straight on the wall. The result is amazing, you get the appearance of a proper upholstered headboard.{found on metalandmud}. […]
Pingback by 34 ý tưởng tự thiết kế đầu giường « Hà Tử Minh March 3, 2012 @ 12:10 am[…] -Fronhas com óculos This entry was posted in design and tagged cama, fronha, óculos, quarto by Daniele. Bookmark the permalink. […]
Pingback by Fronhas com óculos para ele e para ela | Coisas para Casa March 7, 2012 @ 3:48 am[…] This zigzag headboard has a similar effect as the wallpaper headboards above, but the supply of choice is fabric stiffened with starch. With the help of an iron and an eye-catching pattern, the results are crisp and clean! [full tutorial at Metal & Mud] […]
Pingback by 25 Gorgeous DIY Headboard Projects - Decoist March 20, 2012 @ 3:41 am[…] I always thought this was made out of wallpaper as well, but no, it’s fabric! Check out the DIY here. […]
Pingback by Headboard Inspiration « .ariela's studio. May 9, 2012 @ 3:14 am[…] I bet nobody attempted this at home. This brilliant idea of creating a headboard that isn’t really a headboard occurred in the lack of not having some scrap material to make a real one. The projects consists in taking a piece of fabric, cut it in any shape you like , apply liquid starch, so it becomes removable and then iron the board straight on the wall. The result is amazing, you get the appearance of a proper upholstered headboard.{found on metalandmud}. […]
Pingback by DIY: Headboard Ideas | Totally Love It July 2, 2012 @ 12:08 pm[…] Source: Metal and Mud […]
Pingback by List of 50 DIY Headboards - All Very Do-Able Ideas - Modestly Handmade July 8, 2012 @ 3:36 pmTrying to update my bf’s place, and he has a polyester flag (15″ x 13″); do you think this would work on that fabric?
Comment by Mo September 5, 2012 @ 5:12 pmOkay, I do think it will work, but I have a few tips:
1. Spray just a little corner of the flag first, to make sure it doesn’t discolor it.
2. Once you’re sure it’s fine, go ahead and spray the whole thing, but don’t over saturate it. Make sure you’re spraying the BACK.
3. When you start to iron it on to the wall, make sure you put a fairly thick piece of fabric between the iron and the flag. Since the flag fabric is thin, you need to buffer the heat or it will heat the wall up too much and possibly pull off a little paint when you remove it later.
Let me know how it goes!
Comment by metalandmud September 6, 2012 @ 8:39 am[…] Fabic başlık.Kimseyi bahis evde çalıştı. Gerçekten gerçek bir hale getirmek için bazı hurda malzeme olmaması eksikliği oluştu bir başlık olmayan bir başlık oluşturma Bu parlak bir fikir. Projelerin bir kumaş parçası alarak oluşur, istediğiniz herhangi bir şekil kesilmiş Sıvı kola uygulanır, bu yüzden çıkarılabilir hale gelir ve daha sonra düz duvara kurulu ütüleyin. Sonuç şaşırtıcı, size uygun bir döşemeli headboard görünüm elde. {Bulunamadı metalandmud }. […]
Pingback by 10 Farklı Yatak odası Fikirleri | Ev Dekorasyon, Mobilya Fiyatları ve Modelleri January 11, 2013 @ 11:23 amI was initially browsing for tips for my very own weblog and came
Comment by http://tinyurl.com/felomoor51640 January 11, 2013 @ 3:35 pmacross your blog, “How To: Fabric Headboard �”,
would you mind if I apply a number of of your suggestions?
Appreciate it ,Rolando
[…] you’re renting or sticking to a shoestring budget, this $9 fabric headboard project uses a product called Stiffen Stuff, which reacts to the heat of a clothing iron and […]
Pingback by DIY Headboards - Bob's Blogs January 17, 2013 @ 5:53 pm[…] metalandmud.wordpress.com via Jason on […]
Pingback by TGIF Pinterest Finds | Bites of Balance February 24, 2013 @ 9:48 pm[…] from Welcome to Heardmont, Fireplace Mantel from The Old Painted Cottage, Fabric Headboard from Metal and Mud Now please link up your creative […]
Pingback by DIY Headboards– Create and Share! March 11, 2013 @ 9:12 pmLOVE this idea!! Wondering if it would work on wood paneling walls?? Our rent house has wood paneling walls, like the REALLY old, came with the house, walls. I can’t even put scotch tape on them without it peeling, so I’m too chicken to use the removable wallpaper. Wondering if this will work since it doesn’t really peel off any paint or anything.
Comment by Tara March 13, 2013 @ 2:21 amIt could work! I’d test it in a small, inconspicuous place to start, though. Iron a small patch to the wall, leave it for a week or two and see how It comes off.
Good luck!
Comment by metalandmud March 13, 2013 @ 9:51 amMy daughter wants a zebra room, going to try your technique to apply zebra fabric to part of a wall with crown molding framing it and to the inside of her door. Then I don’t have to worry about trying to paint over those black stripes later.
Comment by Nannufactured March 14, 2013 @ 9:18 pmGreat idea!
Comment by metalandmud March 18, 2013 @ 9:42 pmHow about in a kitchen behind the stove?
Comment by Cristine kreplick March 15, 2013 @ 10:17 amHm… I’d be concerned about grease and food splatters. It would be really hard to clean if you got it dirty.
Comment by metalandmud March 18, 2013 @ 9:45 pmis there something special you have to do to take off or just peel off? i want to use this idea as an accent wall in my apt.
Comment by urecha March 18, 2013 @ 9:07 pmNope! Just peel slowly!
Comment by metalandmud March 18, 2013 @ 9:42 pmDo you think this would work on wood panelling
Comment by Lexus April 1, 2013 @ 6:11 pmIt should, but depending on the type and age of the paneling, it might peel when you remove the fabric eventually. I’d try a test patch in an inconspicuous area before doing anything large scale and obvious. Good luck!
Comment by metalandmud April 6, 2013 @ 7:18 pmThere is a much easier way to apply fabric to walls, etc. You cut out the size of fabric you need. Pour liquid starch into a paint tray. You can also use a shallow pan.
Comment by Jo April 2, 2013 @ 12:51 pmRoll the starch onto the top half of the wall with your paint roller. Apply an even coat.
Attach the top of the fabric to the top of the wall, smoothing it flat with your hands. Apply starch to the bottom of the wall and finish smoothing the fabric on.
Apply a coat of starch to the entire surface of the fabric that is now attached to the wall. Smooth out any wrinkles with your paint roller or hand as you do this. Repeat the entire process until the walls are covered. Works great.
I’m sure that would work too, but it sounds a lot messier than just spraying starch on the back of the fabric. This might be better for large scale projects, like wallpapering an entire wall in fabric.
Comment by metalandmud April 6, 2013 @ 7:16 pmI love this (found you on Pinterest)! do you know if this will work on those horrible textured walls most new apartments (at least in my area) have?
Comment by Veronica April 2, 2013 @ 10:05 pmTry it with a small test patch to find out! I don’t see why it wouldn’t.
Comment by metalandmud April 6, 2013 @ 7:17 pm[…] A few metres of fabric can make a seriously cool feature panel – and when you’re sick of it, just peel it off. How do you get it to stick? Easy – spray on starch, then iron onto the wall! (See tutorial here). […]
Pingback by Art Prints & NZ Prints Blog - Endemicworld - Interiors Ideas 13 April April 11, 2013 @ 4:49 pm[…] Source […]
Pingback by Favourite “Pins” Friday | Life Outside the Box with the Cartens April 19, 2013 @ 11:14 amGreetings from Ohio! I’m bored to tears at work so I decided to browse your site on my iphone during lunch break. I enjoy the info you provide here and can’t wait to take a look
Comment by http://nuevatierrasta.Com/ April 29, 2013 @ 6:43 amwhen I get home. I’m shocked at how quick your blog loaded on my phone .. I’m not even using WIFI, just 3G .
. Anyhow, great site!
I know this is an older post but I just came accross it on pinterest and I think it’s amazing! Do you think it would work with felt?
Comment by Sarah June 5, 2013 @ 10:54 pmMy gut instinct says no, because the iron might melt/burn the felt. But I’ll tell you what I’ve told everyone… Pick an inconspicuous spot, and try a small test patch! Let me know how it goes!
Comment by metalandmud June 17, 2013 @ 10:53 amDidn’t see this question posed as I scanned through the blog: Would this work in a bathroom? Or would the fabric pucker or slip off the wall? Long, hot showers are not done in this household with water meters!
Comment by Debi June 9, 2013 @ 9:23 amI think it would likely work, as long as it was a fairly small section. I haven’t used this in a bathroom, so I can’t say with certainty. I would just encourage you to try a small test area, leave it up for a few weeks and see how it goes before committing to a big project.
Comment by metalandmud June 17, 2013 @ 10:50 amGreat way to decorate in military housing. I didn’t have a craft store in Hawaii so I used a cornstarch mixture my grandmother taught me for ironing starch only stronger. Was able to take down for the housing inspection before leaving housing all in one hour . Clean up was a breeze. Sponge and mild soapy water and no mess
Comment by Kimberlee Vancelette June 10, 2013 @ 1:47 pmThis is the cutest idea! Very impressed. Also, I have to say I love your pillowcases. Those are truly adorable! Thanks
Comment by Judy B July 2, 2013 @ 11:07 amHey! This looks perfect for me 🙂 do you know if this can be done to a whole wall? We have a really ugly color on our wall that does NOT match my bedding–and can’t paint it!
Comment by Lindsay July 5, 2013 @ 11:40 pmIt’s possible, just a lot of work and spray!
Comment by metalandmud August 2, 2013 @ 12:27 pmI’m also considering this for a whole wall. Also, I’m curious how long it would stay on the wall. How long was yours up?
Comment by mandy July 6, 2013 @ 8:54 pmMine was only up for about a year (I moved after that).
Comment by metalandmud August 2, 2013 @ 12:27 pmDo you think this would work on painted cinderblocks? My dorm room is very white and bland and this would be a perfect way to livin it up.
Comment by Anna July 9, 2013 @ 1:08 pmHi! I’m curious if it’ll work on an older wall paper.. Or do you know? Thanks!
Comment by Shelby Lynn July 21, 2013 @ 11:06 pmI don’t know! Try it in an inconspicuous place. My only concern would be discoloration.
Comment by metalandmud August 2, 2013 @ 12:26 pmhave you used “faultless” ? Is the only one I have found and I want to tray this over painted wood closet doors.
Comment by patts July 22, 2013 @ 2:32 pmI haven’t tried straight starch, but several other commenters have said it works! Give it a shot!
Comment by metalandmud August 2, 2013 @ 12:25 pmSuper excited to find this!!!! We are renting a 100 yr old house and let’s just say my 80yr old landlord is partial to her at least 50-80 yr old wallpaper. Which I would give anything to cover-up and breathe new life into those dingy walls.
Comment by Christa July 24, 2013 @ 1:18 pmHi!
Comment by Doucevictime August 12, 2013 @ 3:20 pmDo you think it would work on furniture like Ikea lack tables?
How do you get it of the wall again?
Hm, that’s a fantastic question, but I don’t know he answer! I think as long as the surface had been painted or stained, it should work. Not sure about wood laminate or plastic (not sure what Lack tables are made from).
To remove you literally just peel it off. Easy peasy, no residue left behind!
Comment by metalandmud August 12, 2013 @ 3:29 pmI have a quick question. Did the fabric stick to the shower curtain. I have some fabric stiffener that I’ve used before and it goes through the fabric and sticks to what I used to let it dry. Thank you for the idea. I may do this on my kids wall so that when they are tired of it, I can change it up with ease.
Comment by Stephanie August 15, 2013 @ 10:57 amNo, I didn’t have that problem at all.
Comment by metalandmud August 23, 2013 @ 12:50 pmWhat?! This is amazing!! We are expecting our first little one in January and really wanted to do an accent wall with some type of wall paper or something but were skeptical. When we first moved into the house it was borders galore so the idea of wallpaper was like a nightmare! I loooove this idea though!! How long exactly did you have the fabric up before taking it down?
Comment by Runt August 23, 2013 @ 12:44 pmI’m expecting my first in January too!!
It was up for a little less than a year.
Comment by metalandmud August 23, 2013 @ 1:08 pmLove this article and the tutorial. I am curious though. You say to use a “good quality decorator fabric”. Does that refer to the weight of the fabric that should be used?
Comment by Michael Denney September 2, 2013 @ 2:59 pmWould you be able to cover an entire wall that has paneling? Me and my boyfriends bedroom has one wall that’s paneling and it looks absolutely hidious(it’s an old house and we are renting) would this work on there?
Comment by Denise September 9, 2013 @ 9:27 am[…] Ultimamente tenho visto muitos desses tecidos adesivos. Na Mobly tem algumas estampas, mas nenhuma tão linda quanto desse tecido. Via Metal Mud […]
Pingback by MeninasEstilosas.com.br » Decor Inspiration: Cabeceiras para você fazer já! December 20, 2013 @ 1:38 pm[…] viaIf the space in your bedroom is so tight that you can’t spare the inches for a headboard, adding a faux headboard is a great money saving option and takes up zero floorspace. Directions for this technique can be found here. […]
Pingback by How to: Add Style to a Small Bedroom - Worthing Court December 26, 2013 @ 1:08 pm[…] 13 Comments Just thought I’d share a great idea that I stumbled across the other day over at Metal and Mud. Just maybe there’s someone else like me who’s been living under a rock and […]
Pingback by Money Saving, Space Saving Headboard Solution - Worthing Court January 11, 2014 @ 10:12 amFor a King size bed would a yard still be adequate? Or do I need more? I love this idea!!!
Comment by Sara Jayne January 12, 2014 @ 10:48 pmI loved your fabric headboard! I lived in Germantown, and miss my house and life there so much! But, it was all a facade, and I am now alone, divorced, and my kids live with my ex. My apartment is bare, and I am broke. So, I’d like to know how you removed this from the wall without damaging the paint. I’ve never worked with starch.
Comment by Jen C. June 2, 2014 @ 1:41 pmThanks
Thank you so much for this idea! I love it!!! Did it leave any residue on the wall when you peeled it off
Comment by Sierra June 9, 2014 @ 1:24 pmNo residue!
Comment by metalandmud June 9, 2014 @ 1:27 pmCan you decorate an entire wall as if it were painted with this method as well?
Comment by Dre September 18, 2014 @ 9:45 pmI cannot find Stiffen Stuff anywhere near me. Do you think Aleene’s Stiffen-Quick as a replacement?
Comment by Jennifer March 15, 2015 @ 8:19 pmSounds like it would work!
Comment by metalandmud April 1, 2015 @ 8:35 am[…] Metal and Mud […]
Pingback by 20 Creative Headboards for a Bedroom Makeover | Home Design Lover July 31, 2015 @ 9:26 pm